Saturday, March 12, 2011


Wednesday, March 2, 2011
China Glaze Crackle Glaze Review!! (With Pictures)
I was soooooo excited when i heard that China Glaze was coming out with a 6 piece crackle collection. I wanted to try the OPI Black Shatter from their Katy Perry Collection but my Ulta was all out! So when i got wind of this collection i ordered it on amazon right away, before any stores got it. I have to say, I'm really Impressed.
Word to the wise.Whenever you apply these you have to make sure the nail polish is fully dry because I've noticed that in my impatient moments that the crackle didn't crack correctly. It dosen't look bad, the crackle just looks really vertical and, I like it more in rectangles.
Overall, I'm really Impressed with this and I'll definitely be buying these if they come out in more shades the only one I had a problem with is the Purple, it has its crackle moments and the other times its in weird lines.I also heard that OPI's Pirates of the Caribbean Collection is going to have a Silver Shatter,I'm gonna be all over that!
Anyways, I hope this was helpful and thanks for reading! Pictures Posted Below!
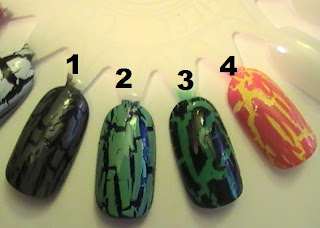
1.Cracked Concrete Crackle on top of China Glaze Liquid Leather
2.Crushed Candy Crackle on top of China Glaze Up All Night
3.Black Mesh Crackle on top of Orly Green with Envy
4.Broken Hearted Crackle on top of Sally Hansen Mellow Yellow
5.Fault Line Crackle on top of Sally Hansen Fuchsia Power
6.Cracked Concrete Crackle on top of Sally Hansen Fuchsia Power
7.Lightning Bolt Crackle on top of China Glaze Liquid Leather

Word to the wise.Whenever you apply these you have to make sure the nail polish is fully dry because I've noticed that in my impatient moments that the crackle didn't crack correctly. It dosen't look bad, the crackle just looks really vertical and, I like it more in rectangles.
Overall, I'm really Impressed with this and I'll definitely be buying these if they come out in more shades the only one I had a problem with is the Purple, it has its crackle moments and the other times its in weird lines.I also heard that OPI's Pirates of the Caribbean Collection is going to have a Silver Shatter,I'm gonna be all over that!
Anyways, I hope this was helpful and thanks for reading! Pictures Posted Below!
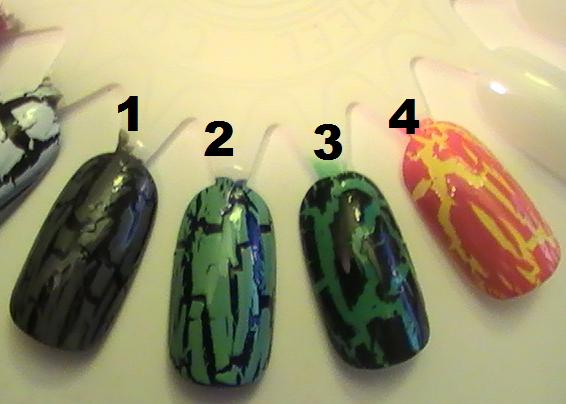
1.Cracked Concrete Crackle on top of China Glaze Liquid Leather
2.Crushed Candy Crackle on top of China Glaze Up All Night
3.Black Mesh Crackle on top of Orly Green with Envy
4.Broken Hearted Crackle on top of Sally Hansen Mellow Yellow
5.Fault Line Crackle on top of Sally Hansen Fuchsia Power
6.Cracked Concrete Crackle on top of Sally Hansen Fuchsia Power
7.Lightning Bolt Crackle on top of China Glaze Liquid Leather

Monday, November 2, 2009
Whoops
So, i realize that for the past 2 weeks i've failed to provide posts.That's because I've been out of town for a while. But trust me, there are plenty of good things to come.
So stay tuned.
So stay tuned.
Sunday, October 18, 2009
Tip of the week!- Keeping your eyeshadow on all day!
So, this week's tip is gonna be really short. I've been working to get more things together for this blog because sometimes when i come to do the tip of the week I get really blank so I want to have some interesting things to tell you guys .
Anyways, here are some tips for keeping on your eyeshadow all day:
Anyways, here are some tips for keeping on your eyeshadow all day:
- Use and eyeshadow primer, yes they can be a bit pricey at times but it's totally worth it. Just apply it all over your lid up to your eyebrow then apply any eyeshadow you want.
- If you don't have an eyeshadow primer use some concealer or foundation on your eyelid then set it with some translucent powder then apply your powder eyeshadow. DON"T USE THIS WITH CREME EYESHADOW! It'll just blend together and create a really wierd color and you don't want that.
Friday, October 16, 2009
Gothic Makeup Contest Entry
These are just some pictures of my Gothic makeup look i did for the weekly challenge on Makeupgeek.com.
I thought it would be fun also because Halloween is coming up. I also think this would be an awsome Vampire look too. What i used:
Face:
- Bare Escentuals Matte Foundation in Light
- Bare Escentuals Faux Tan to contour
Eyes:
- MAC Beauty Marked Eyeshadow all over the lid and on the crease also on the bottom lash line
- Bare Escentuals Snow Eyeshadow on the brow bone and used to blend out the edge of the beauty marked
- Prestige Black Waterproof pencil on the Upper lash line and the water line
- Covergirl Lash Blast Mascra
- Wet & Wild Fantasy Makers in red and black , i scraped some off and mixed them together till i got the right color
Eyebrows:
- Wet & Wild Fantasy Makers in black used with an angled eyebrow brush


Sunday, October 11, 2009
Tip of the week- Mascara smudges
This week's tip is short and sweet. It's all about mascara smudges, wether its on your eyelid or if you have a random eye spazm and its all under your eye. Here are some tips to help with those woes.
Thanks for reading the tip of the week!
- WAIT! Wait a few minutes and let the mascara dry up and it should chip right off without causing a disaster to the eyeshadow you put on but, if you do end up with a bald spot just fill in the blank with whatever eyeshadow goes there.
- If you went too far and now the mascara has smeared just use a little makeup remover or mousturizer on a q-tip and take it off and, like i said before, just fill in the blank where the eyeshadow was.
Thanks for reading the tip of the week!
Sunday, October 4, 2009
Tip of the week- How to make your lips look bigger!
This weeks tip of the week is for pretty much everyone, even me. Alot of people i come in contact want full plumped up lips without the use of collagen or lip plumpers. So, here are some tips on how to get a plumped up pout:
- Apply a light reflecting concealer right outside the line of your lips and blend out, it'll create shading so your pout looks plumped
- Use a lipliner and line your lips a little bit outside your natural lip line, dont go too far or you'll like a hot mess, we want to keep it more on the natural side.
- Use a gloss, colored or clear
- Apply a sparkly lipgloss in the center of your bottom lip, IF you're using a colored gloss, you can use a color one shade lighter than the base gloss just use the same placement as the sparkle one. This makes your bottom lip look bigger and poutier
Subscribe to:
Posts (Atom)